Showing posts with label recipe. Show all posts

Friday, September 6, 2013

Spiced Pumpkin Scones: A Taste of Fall

Spiced Pumpkin Scones & English Tea
Ah, September!  Never mind that you are potentially the hottest month of the year in Atlanta, Starbucks seems to believe that it is now officially fall (if their pumpkin themed menu is to be believed).  From the delighted FB posts of my friends, I have concluded that pumpkin spice lattes and cream cheese filled pumpkin muffins and pumpkin scones and pumpkin bread must be akin to Nirvana (the experience of transcendent bliss, not the musical group).

Okay, I can dig it.  I love spiced pastries and baked goods as much as the next person.  I will admit to trotting out the Caramel Apple Cupcakes at a recent gathering on September 1st, the very first day that that such a fall treat might be acceptable.

I love fall.  It is my favorite season.  The brilliant blue skies, stark white clouds and changing leaves make me feel all warm and fuzzy inside.  When I was asked to make pumpkin scones for an upcoming wedding, I was a bit intimidated.  I love making scones, but pumpkin?  With all the Starbucks whooplah, that's a tough act to follow.  What if they aren't good?  Or aren't pretty?  Or, worse, just taste awful?  Anxiety...

Time for the test kitchen.  Although I was given a "tried and true" recipe by the Mother of the Bride, I can't resist tweaking recipes to suit my fancy.  So here it is: My Spiced Pumpkin Scone Fancy.


Spiced Pumpkin Scones

Scones:
1 3/4 c. AP (all-purpose) unbleached flour
1/4 c. milled flax seed
7 Tb. raw Turbinado sugar
1 Tb. baking powder
1/2 tsp. sea salt
1/2 tsp. ground cinnamon
1/2 tsp. ground cloves
1/2 tsp. ground nutmeg
1/4 tsp. ground ginger
6 Tb. frozen butter
1/2 c. chilled canned pumpkin
3 Tb. heavy cream
1 large egg, cold

Glaze:
1 c. powdered confectioner's sugar
1/2 tsp. ground cinnamon
1/2 tsp. pure vanilla extract
1/4 c. heavy cream

Directions

One of the keys to making scones is making sure the butter is cold...really cold.  You will need to work quickly to keep all the ingredients as cold as possible.  Remember: cold is key.


1. Prepare the butter for freezing.  First, unwrap the stick of butter.  Slice the stick of butter into pats, cutting across the width of the butter.
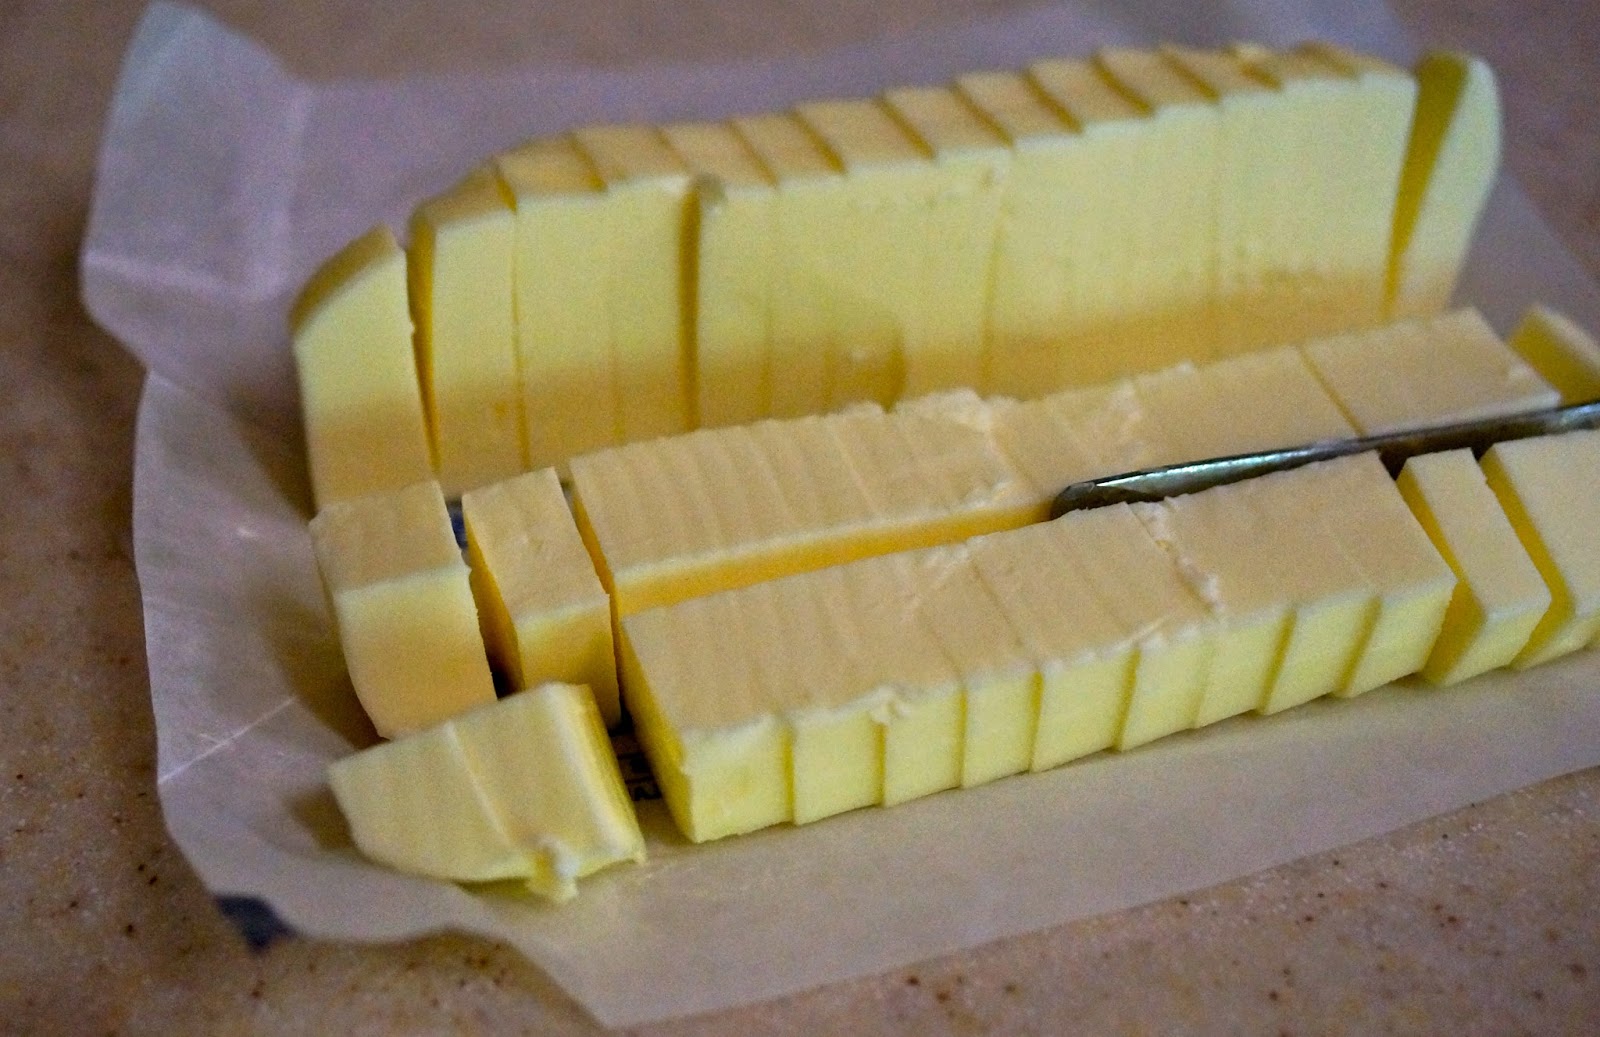


After you've sliced the butter into pats, cut the stick in half lengthwise; then again lengthwise on each longitudinal half of the stick.  Each pat should now be in quarters.


Flip the butter pieces into a bowl and put the bowl in the freezer until you are ready to mix the dough.


2.  Measure out the dry ingredients: flour, milled flax seed, raw sugar, baking powder, ground cinnamon, ground cloves, ground nutmeg, ground ginger and sea salt.


Put dry ingredients into your food processor and process about 15 seconds or so to mix the ingredients and chop the raw sugar into smaller pieces.


3.  Prepare the wet ingredients.  We aren't ready to add them to the dry ingredients yet, but we want them ready and chilling, literally, until the proper time.  You've already prepared the butter, and it should be in the freezer awaiting your pleasure. Measure out the chilled, canned pumpkin and put it back in the refrigerator.


egg & cream


Crack the cold egg into a small bowl; add the cream and whisk until incorporated.  Put the egg and cream mixture back in the refrigerator until you are ready to mix the dough.


4.  Prepare your work area.  Get everything ready while the cold ingredients are waiting in the fridge.  Don't be lazy and leave them out; it matters.  You will need a lightly floured surface upon which to roll out the dough, a rolling pin and a baking sheet covered in parchment paper.  Leave the flour out, as you'll need a little to sprinkle on the top of the scone dough to keep it from sticking to the rolling pin.


5.  Ready, Set, GO GET THE BUTTER!  Put the frozen butter into your food processor with the dry ingredients.


dry ingredients and cut-in butter


Affix the lid and process about 10 to 15 seconds.  Check.  If there are large chunks, process in short bursts until the mixture looks like course meal.


adding pumpkin, egg and cream


Retrieve the pumpkin, egg and cream from the fridge and add them to the processor.


process just until dough clings together


7.  Process in short bursts, about 12 to 15 or so.  Stop when dough seems to cling together in clumps.  Do NOT over mix the dough!  Less is better.


quickly shape the dough into a ball


8.  Squish the dough together using your hands as little as possible.  They are warm and will heat up the dough.  Use a spatula to remove all dough from processor.  Shape into a ball on the floured surface.


8 x 6 inch rectangle, 3/4 inch thick


9.  Shape the dough into a rough rectangle, about 8x6 and 3/4 inch thick.  Try to even up the sides, but touch the dough as little as possible with your hot little hands. (Hot hands melt butter).


10.  Use a dough scraper, knife or whatever your heart desires to cut the scones into the shape of your choosing.  I prefer squares, as my triangles look like they were cut out by a drunken sailor.  Biscuit cutters work well, too.


ready to bake
Use a chilled, floured blade to cut the scones.  Using firm pressure, cut directly down into the dough and bring the blade straight back up without twisting.  This will (allegedly) help the scones rise properly.  Place cut scones about an inch apart on a baking sheet covered with parchment paper.

Scones tend to spread out, so you'll want to give them some room.  I've "sealed the edges" with flour on these, based on some internet advice I read about how to prevent scones from spreading out into an ugly heap.  The jury is out on whether or not I think it actually works. Let me know how it works out in your kitchen.

pumpkin scones, fresh from the oven

11.  Bake the scones in a 425 degree oven for 14 to 16 minutes, or whatever works for you.  All ovens are different, so make adjustments for your particular oven's quirkiness.  Remember to lower the temp by 25 degrees if you are baking on a dark pan.  Increase the bake time if you are using a baking stone or glass pan.  Scones are done when they look set and are just starting to brown.

Allow scones to come to room temperature before icing.  If you glaze them while they are warm, the icing will melt.  This may not be a bad thing if you are going to eat them immediately, but they won't be as pretty if you plan to serve them later.
pure vanilla, ground cinnamon, cream, confectioner's sugar


12.  For the icing, you will need confectioner's sugar, ground cinnamon, pure vanilla and heavy cream.  Add the cream to dry ingredients one tablespoon at a time, whisking after each addition.


whisk icing until smooth


Once the glaze is a thick yet spreadable consistency, whisk until smooth.  Transfer to a pastry bag fitted with a round tip and glaze scones.


cut off 1/2 inch tip of bag corner


In lieu of a pastry bag, I prefer to use a Ziploc freezer bag, as they are disposable.  To use a Ziploc as a pastry bag, cut 1/2 inch off of one corner of a quart sized freezer Ziploc bag.


insert coupler inside Ziploc


Put a frosting tip coupler into the ziploc, pressing it into the inside of the cutout corner.


cap with metal tip; screw on band to secure


Place a round tip over the outside of the bag and coupler tip; secure it by screwing the ring band over the top of the metal tip and onto the threads of the coupler, over the top of the Ziploc bag.


use cup to stabilize Ziploc for filling


Once the pastry tip has been fitted, put the bag down in a larger cup to support the bag while you fill it with icing.  Fold the bag over the edges of the cup to fill more easily.


poor man's pastry bag, ready to use


After all of the icing has been scraped into the bag, remove the Ziploc from the cup and twist the bag top down to compress the icing toward the tip.  Don't seal the bag, or you may have an icing explosion. :-)


iced scones


Squeeze the bag to dispense the glaze, drizzling it over each scone. Allow to dry before touching or you may disturb the sweet, cinnamon-laced goodness.


afternoon tea or midmorning snack


TAAAA DAAAA!  Spiced Pumpkin Scones.  And you didn't have to go to Starbucks to get one.  Enjoy, and please let me know how they worked for you.

Blessings,
Wyndy
Sourcing
Linens: Longaberger
China: Johnson Bros Harvest Time
Ceramic pumpkin: Hobby Lobby
Food processor:  Cuisinart
Baking sheet: Doughmakers
Herb nippers: Pampered Chef
Dough scraper: Dexter Russell
Parchment paper, vanilla, bulk spices: Costco
Pastry tip and coupler: Wilton

Thursday, August 30, 2012

Georgia Peaches: Sweet Heat Salsa!

When I think of Georgia in the summer, I think of sweet white corn, peaches and peanuts.  It is such a blessing to be able to purchase organic fruits and vegetables from local farmers through community farmers markets.  I love the delightful unexpectedness of the markets, as you never know which vendors will be selling or what they might have for sale.  I may go looking for tomatoes and come home with scuppernogs. Ah, bliss!


On a recent market visit, I was lucky to find beautiful peaches at an unbelievably low price.  They were gorgeous: huge firm round globes of juicy goodness. Must make peach salsa! And into my shopping bag they went, along with some peppers, purple onions, sweet red peppers, jalapeños, habaneros and cilantro.  My mouth was watering already. If you've never tried peach salsa, you're missing out!  It is wonderful on tortilla or pita chips, as a relish for grilled mahi mahi or pork chops.  You can use it as a topping for ice cream, on pancakes or waffles, or rolled up in a crepe with a dollop of whipped cream...But I digress.

My favorite peach salsa recipe is a variation on the one published in the Ball Complete Book of Home Preserving.  I like the salsa spicy, so I add a few habaneros.  For eight 8-ounce jars, you will need:

Recipe
1/2 cup (125 mL) white vinegar
6 cups (1.5 L) chopped pitted peaches
1 1/4 cups (300 mL) chopped red onion
4 jalapeños, finely chopped
1 red bell pepper, seeded and chopped
1/2 cup (125 mL) loosely packed chopped cilantro
2 Tb (30 mL) liquid honey
1 clove garlic, finely chopped
1 1/2 tsp (7 mL) ground cumin
1/2 tsp (2mL) cayenne pepper

You will need a water bath canner, which is essentially a deep stock pot with a rack in the bottom to keep the jars from direct contact with the heat source.  I use a stock pot with the rack pilfered from my pressure canner.  You will also need a wide-mouth funnel, a jar lifter, a magnetic stick for grabbing lids out of hot water, and half-pint canning jars, bands and lids.  If you have an Ace Hardware near you, they generally have good prices on canning supplies.

Method
1.  Prepare canner, jars and lids according to safe home canning methods, which can be found at the National Center for Home Food Preservation.

Everything in the pot!  


2.  In a large stainless steel saucepan, combine ingredients.  Bring to a boil over medium-high heat, stirring frequently, until slightly thickened, about 5 minutes.  Remove from heat.


Ready for lids and bands


3.  Ladle hot salsa into hot jars, leaving 1/2 inch (1 cm) headspace.  Remove air bubbles by stirring gently, pressing in from the outside towards the middle.  Wipe rim.  Center lid on jar.  Screw band down until resistance is met, then increase to fingertip-tight.


4.  Place jars in canner, ensuring they are completely covered with water.  Bring to a boil and process for 15 minutes.  Remove canner lid and wait 5 minutes, then remove jars with jar lifter and place on a folded tea towel or hot pad to cool.  Check seals after 20 minutes.  If you press the lid in the center and it "pops," the jar did not seal. Refrigerate and use within a week, or remove lid, wipe rim, apply new lid and band and reprocess.

Summer flavors captured in a little jar of heaven

5.  Do not disturb jars for 24 hours.  Then remove bands, rinse, label and store.

Tips
If you like your salsa milder, seed and devein the jalapeños.  Wear plastic gloves when handling peppers and don't touch your eyes, nose, mouth or any other potentially sensitive area.  Pepper oil will remain on your skin for several days, even after washing your hands.

If you like hotter salsa like I do, use 3 jalapeños and 3 habaneros.  Seed and devein the peppers.

To keep peaches from darkening while I prep them, I pour about a cup of vinegar into the bowl where I'm keeping the chopped peaches.  Give it a stir every so often to make sure all the peaches have gotten a vinegar bath.  When you are ready to use the peaches in salsa, drain the vinegar and measure peaches into the pot.  DON'T use the soaking vinegar in the salsa; it has been diluted with peach juice and the acid level will not be safe.

Happy canning!  Let me know what you think!

Wednesday, April 18, 2012

Experimenting with Asparagus

I like to experiment with food.  What this actually means is that I don't generally follow recipes as they are written.  This free-form approach to cooking is a joy to me, and a frustration to those requesting recipes.  My goal today was to use only items I had currently available in my fridge, freezer and pantry.  So...what's for supper?

I've recently discovered the delight of grilled mixed vegetables.  Since I only use the tips of the asparagus in those tasty veggie pouches, I had an abundance of asparagus stems, waiting patiently in my fridge to be repurposed.  Today was overcast and rainy; the perfect day for soup.  Inspiration!  Cream of asparagus soup.  And what else?

On rainy days, I like to bake.  What better on a drizzly day than soup and freshly baked bread?  I had a plan.  Now, to execute...

Asparagus spears, purple onion, EVOO & herbs
First up: I wanted to roast the asparagus to bring out a nice, rice flavor.  I found half a purple onion and tossed it in the pan.  A drizzle of EVOO, sprinkle of sea salt and freshly ground black pepper, crushed oregano, basil and rosemary, and into a 400 degree oven it went.


Sticky basil batter in the bread machine, ready to rise


While the asparagus roasted, I started a batch of Basil Batter Rolls from the Ultimate Southern Living Cookbook.  However, I wanted to use my bread machine to do the mixing, and altered the recipe a bit to make it healthier.  Instead of shortening I used butter, and substituted Eagle Mills While Whole Wheat Flour.  I set the bread machine to the dough cycle, and let her rip.  The recipe says the dough will be sticky, so I stopped adding flour when the dough looked like this:


Roasted asparagus to be pureed in the food processor

Meanwhile, the roasting asparagus has filled the kitchen with a mouth watering aroma.  Once the spears and purple onion were tender, I transferred them to my food processor to puree for the soup.


Wild caught Florida blue crab

Epicurious once again provided the inspiration for my experimentation: Cream of Asparagus Soup. After a cursory glance at the requisite ingredients and perusal of the associated reviews on my trusty Epicurious phone app, I rummaged through the freezer in search of homemade chicken or turkey stock.  Lo and behold; what did I find instead?  Crab stock, from these beauties wild caught by my brother Russ near Navarre, Florida: 


Oh, yes.  That will do nicely!  Into the crab stock went the pureed roasted asparagus, purple onions and a bit of minced garlic.  After simmering about a half hour, I added homemade creme fraiche and thickened the soup with a bit of butter and whole wheat flour.  Nothing left to do for the soup except let the flavors blend and bake some bacon for a garnish.  Meanwhile, something strange was going on with the roll batter/ dough...

With about 1/2 an hour to go in the dough cycle, the batter/ dough had risen to the top of the bread machine and was overflowing the pan.  This didn't happen when I followed the standard recipe, so the warmth of the bread machine dough cycle must require less yeast.  Note to self.  Time to transfer the dough to a bowl and start spooning out rolls.  Easier said than done.

Whole wheat basil batter rolls, ready to rise
Remember that the recipe said the dough would be sticky?  Yessir.  VERY sticky.  It stuck to the spoon, the bowl, my fingers, the muffin tins--pretty much everything it touched.  Consequently, it was really hard to portion the dough equally.  Here are the golden blobs of dough, ready for the second rise:


Basil batter rolls, or baby brioche?


Again, the dough rose much faster than anticipated.  The rolls doubled their size in less than 30 minutes, not the 50 estimated.  Into a 400 degree oven they went for about 15 minutes.  Ohhh, something smells good...


Light, fluffy basil batter rolls, hot from the oven


Although the cookbook calls these Basil Batter Rolls, they really look and feel more like a slightly more dense cousin to brioche.  The pesto, garlic and butter add a wonderfully savory flavor, yet the bread is light and airy.


Cream of Roasted Asparagus Soup


The soup turned really out well!  The crab broth added an unexpected flavor complexity to the still delicate cream of asparagus soup.  Topped with crispy bacon, this is comfort food of the grown-up sort.  I will be making it again.

Now, if I can just get the hang of how to layout the blog text and pictures properly, I'll be a happy girl.